C.S.A. Appreciation Potluck!
The date for this years C.S.A. appreciation potluck is set for October 8th. Please bring a dish to share, a chair and your family. We will have a nice potluck around the fire then have a Hay-Rack ride if anyone wants one.
When: October 8th
Time: 11:30 AM - ?
Where: Bass Farms
Thz Chris

From our Fields to Your Table
Thursday, September 29, 2011
Sunday, September 25, 2011
Squash Kabobs
- 2 lbs butternut squash (or acorn)
- 3 tablespoons butter, melted
- 1 teaspoon curry powder
- 8 wooden skewers, 8-inch (or metal)
- salt and pepper
Directions:
- 1Preheat the oven to 450*F. Cut the squash in half lengthwise and remove the seeds. Peel and cut squash halves into 1"-1 1/2" cubes. Place in shallow rectangular baking dish or cookie sheet. In a small bowl, combine butter and curry powder. Drizzle over the squash, tossing to coat thoroughly.
- 2Roast the squash, uncovered, for 20 to 25 minutes or until tender and lightly browned, stirring once or twice. Serve immediately or let cool. Store in an airtight container in the refrigerator up to 2 days.
- 3Serve squash at room temperature threaded on eight 8" skewers. Season to taste with salt and pepper.
- 4Makes 8 servings.
- 5Note:.
- 6To reheat kabobs, grill on gas or charcoal grill directly over medium coals(or preheat gas to medium) about 10 minutes or until heated through, turning kabobs occasionally. Enjoy!
This could potentially be a smash hit.
Thz Chris
Great Weekend~
Thanks to all who came out to the farm this weekend. Me and Brenna really appreciate everyone that keeps coming back to our farm to buy our pumpkins. Also a BIG THANK YOU to the Mt. Vernon Archery Club, for helping us pick so many of the pumpkins that you see on the hill. They Rocked!! They came to the farm bright and early, they worked very hard. Today I picked a ton of squash for this week's C.S.A. box, so that is exciting.
Thz Chris
Thz Chris
Friday, September 23, 2011
C.S.A Members!
This weekend we will be starting our annual Hay-Rack Rides on the weekends. They are free. If you can't make it this weekend don't sweat it! I will be pulling the wagon's until the end of October. Also if you have friends with kids, tell them about the free hay rides.
Chris
Chris
Drying Herb's
With the End of season coming, cut the herbs. They will come up next year just fine. I have found a great article that should help you store the herbs longer. There is a lot still in the bed.
Drying Herbs
Drying is the easiest method of preserving herbs. Simply expose the leaves, flowers or seeds to warm, dry air. Leave the herbs in a well ventilated area until the moisture evaporates. Sun drying is not recommended because the herbs can lose flavor and color.
The best time to harvest most herbs for drying is just before the flowers first open when they are in the bursting bud stage. Gather the herbs in the early morning after the dew has evaporated to minimize wilting. Avoid bruising the leaves. They should not lie in the sun or unattended after harvesting. Rinse herbs in cool water and gently shake to remove excess moisture. Discard all bruised, soiled or imperfect leaves and stems.
Dehydrator drying is a fast and easy way to dry high quality herbs because temperature and air circulation can be controlled. Pre-heat dehydrator with the thermostat set to 95°F to 115°F. In areas with higher humidity, temperatures as high as 125°F may be needed. After rinsing under cool, running water and shaking to remove excess moisture, place the herbs in a single layer on dehydrator trays. Drying times may vary from 1 to 4 hours. Check periodically. Herbs are dry when they crumble, and stems break when bent. Check your dehydrator instruction booklet for specific details.
Less Tender Herbs — The more sturdy herbs such as rosemary, sage, thyme, summer savory and parsley are the easiest to dry without a dehydrator. Tie them into small bundles and hang them to air dry. Air drying outdoors is often possible; however, better color and flavor retention usually results from drying indoors.
Tender-Leaf Herbs — Basil, oregano, tarragon, lemon balm and the mints have a high moisture content and will mold if not dried quickly. Try hanging the tender-leaf herbs or those with seeds inside paper bags to dry. Tear or punch holes in the sides of the bag. Suspend a small bunch (large amounts will mold) of herbs in a bag and close the top with a rubber band. Place where air currents will circulate through the bag. Any leaves and seeds that fall off will be caught in the bottom of the bag.
Another method, especially nice for mint, sage or bay leaf, is to dry the leaves separately. In areas of high humidity, it will work better than air drying whole stems. Remove the best leaves from the stems. Lay the leaves on a paper towel, without allowing leaves to touch. Cover with another towel and layer of leaves. Five layers may be dried at one time using this method. Dry in a very cool oven. The oven light of an electric range or the pilot light of a gas range furnishes enough heat for overnight drying. Leaves dry flat and retain a good color.
Microwave ovens are a fast way to dry herbs when only small quantities are to be prepared. Follow the directions that come with your microwave oven.
When the leaves are crispy dry and crumple easily between the fingers, they are ready to be packaged and stored. Dried leaves may be left whole and crumpled as used, or coarsely crumpled before storage. Husks can be removed from seeds by rubbing the seeds between the hands and blowing away the chaff. Place herbs in airtight containers and store in a cool, dry, dark area to protect color and fragrance.
Dried herbs are usually 3 to 4 times stronger than the fresh herbs. To substitute dried herbs in a recipe that
calls for fresh herbs, use 1/4 to 1/3 of the amount listed in the recipe.
This document was extracted from "So Easy to Preserve", 5th ed. 2006. Bulletin 989, Cooperative Extension Service, The University of Georgia, Athens. Revised by Elizabeth L. Andress. Ph.D. and Judy A. Harrison, Ph.D., Extension Foods Specialists.
Thz Chris
Thursday, September 22, 2011
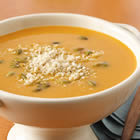
Roasted Butternut Soup
Ingredients
- Roasted Winter Squash:
- 2 tablespoons butter
- 2 cups raw winter squash (butternut, hubbard, acorn)
- Salt and pepper
- Soup:
- 2 tablespoons extra-virgin olive oil
- 1/2 cup diced onion (1/4-inch)
- 1/4 cup diced celery (1/4-inch)
- 1/4 cup diced carrot (1/4-inch)
- 1 cinnamon stick
- Sea salt and freshly ground pepper
- 1 (32 ounce) carton Progresso® chicken broth
- 1/2 teaspoon ground toasted coriander (optional)
- Roasted Winter Squash (above)
- 1/2 cup half-and-half, if desired* (optional)
- 2 tablespoons toasted pumpkin seeds
- 1/2 cup Progresso® plain Panko crispy bread crumbs, toasted light brown in saute pan over medium heat
Directions
- To make roasted winter squash: Heat oven to 375 degrees F. Heat butter over medium-high heat in an ovenproof saute pan; add diced squash, salt and pepper. When squash begins to brown, place pan in oven. Roast for 15 minutes or until medium-brown on all sides. Remove from oven and let cool slightly. Puree in food processor, or mash with potato masher or ricer. Measure 1 1/2 cups squash; reserve.
- To make soup: Heat the olive oil in a large saucepan over medium heat until hot. Add the onion, celery, carrot and cinnamon stick; saute until soft but not brown, about 10 minutes. Season with salt and pepper. Add the broth and the coriander; bring to a boil. Simmer for several minutes. Stir in reserved squash until smooth; simmer gently to let the flavors meld, about 10 minutes. Discard the cinnamon stick.
- Puree the soup using an immersion blender or in a blender until smooth. (The soup can be made ahead to this point, cooled, covered, and refrigerated for several days or frozen for about 1 month. It will thicken as it cools and may need thinning with broth or water when reheating.)
- Return the soup to the pan and reheat gently. Add the half-and-half. Adjust the seasoning with salt and pepper. Top each serving with pumpkin seeds and toasted bread crumbs.
Lightly Fried Green Tomato's

Ingredients
- 4 medium green tomatoes
- 1 teaspoon salt
- 1/4 teaspoon lemon-pepper seasoning
- 3/4 cup cornmeal
- 1/2 cup vegetable oil
Directions
- Slice tomatoes 1/4 in. thick. Sprinkle both sides with salt and lemon-pepper. Let stand for 20-25 minutes. Coat with cornmeal. In a large skillet, heat oil over medium heat. Fry tomatoes for 3-4 minutes on each side or until tender and golden brown. Drain on paper towels. Serve immediately.
Fresh Green Tomato Salsa
Ingredients:
2 cups green tomatoes, chopped
1 (4 inch) piece cucumbers, chopped
1 teaspoon salt
2 chopped green onions
1/2 green pepper, finely chopped
1 jalapeno pepper, finely chopped
1/4 cup cilantro, finely chopped
1 lime, juice of
Directions:
1. In a medium bowl, combine the green Ontario tomatoes with cucumber and the salt.
2. Let stand for 1 hour, stirring occasionally.
3. Drain well and place vegetables in a clean bowl.
4. Add the onions, green pepper, jalapeno, cilantro and lime juice.
5. Stir well.
6. Spoon about half the mixture into the bowl of a food processor, and pulse until finely chopped and quite liquid, about 30 seconds.
7. Spoon puree back in the bowl and chill.
8. Serve with cold meat, crackers and cheese, tortilla chips.
Green Tomato Cake
Ingredients
- 4 cups chopped green tomatoes
- 1 tablespoon salt
- 1/2 cup butter
- 2 cups white sugar
- 2 eggs
- 2 cups all-purpose flour
- 1 teaspoon ground cinnamon
- 1 teaspoon ground nutmeg
- 1 teaspoon baking soda
- 1/4 teaspoon salt
- 1/2 cup raisins
- 1/2 cup chopped walnuts
Directions
- Place chopped tomatoes in a bowl and sprinkle with 1 tablespoon salt. Let stand 10 minutes. Place in a colander, rinse with cold water and drain.
- Preheat oven to 350 degrees F (175 degrees C). Grease and flour a 9x13 inch baking pan.
- Cream butter and sugar. Add eggs and beat until creamy.
- Sift together flour, cinnamon, nutmeg, soda and 1/4 teaspoon salt. Add raisins and nuts to dry mixture; add dry ingredients to creamed mixture. Dough will be very stiff. Mix well.
- Add drained tomatoes and mix well. Pour into the prepared 9 x 13 inch pan.
- Bake for 40 to 45 minutes in the preheated oven, or until toothpick inserted into cake comes out clean.
C.S.A Week 16
This week we have another assortment of good eats. The box is as follows...
C.S.A Week 16
Brussels Sprouts
Herbs
Acorn Squash
Butternut Squash
Green Tomatoes
Pepper Medley (bag of jalapeno, small green peppers)
Gongura
Enjoy
Thz Chris
C.S.A Week 16
Brussels Sprouts
Herbs
Acorn Squash
Butternut Squash
Green Tomatoes
Pepper Medley (bag of jalapeno, small green peppers)
Gongura
Enjoy
Thz Chris
Monday, September 19, 2011
C.S.A. Appreciation Potluck!
The date for this years C.S.A. appreciation potluck is set for October 8th. Please bring a dish to share, a chair and your family. We will have a nice potluck around the fire then have a Hay-Rack ride if anyone wants one.
When: October 8th
Time: 12:00 p.m.-?
Where: Bass Farms
Thz Chris
Sunday, September 18, 2011
C.S.A. Recipe Suggestions(Change)
If you have not noticed, we quit printing our recipe's in the store to be more environmentally friendly. All of our recipe's will be online. We will continue to post our recipe suggestions online from here on out.
Thanks Chris
Thursday, September 15, 2011


Making Pumpkin Puree!!
To make pumpkin puree:
1. Cut the pumpkin in half and bake cut-side down, covered with foil, in a 375 degree F oven for about 90 minutes or until flesh is tender.
2. Allow to cool, scoop out the flesh, and puree.
3. Strain the puree for extra-silky smooth soups and custards.
To utilize your pie pumpkins this is a must have!!!! It will help you in your process of cooking the many pumpkin recipe's that I am going to post.
A four-pound pumpkin should yield about 1½ cups of puree.
Thz Chris

Pumpkin Fritters

Ingredients
Directions
Not the healthiest but tasty none the less, it's ok to indulge every once in a while.
Wednesday, September 14, 2011
C.S.A. Week 15
Brrrrrrrr.....
Don't worry about the cold we never stop at Bass Farms!
This week's C.S.A is quite plentiful. The fall veggie's are really coming soon this year.
Items:
Eggplant....
Once Again we have prevailed with another week of excellent eggplant. We have been so blessed this year by having such an abundant & clean crop of eggplant.
Acorn Squash......
Excellent Brenna cooked me one for dinner tonight. Although I don't know whether I ate more squash or brown sugar. I love them both I guess.
Butternut Squash......
They are large & excellent in taste & quality.
Brussel Sprouts.....
The sprouts this year have been exceptional. They will get better every week, too they love this cold weather.
Cucumbers.....
I think it is safe to say that you all have had enough cucumbers this year, SO I gladly announce we picked the last of them this week. My back is so great-ful. They are in your box for tomorrow.
Beans.......
The beans only gave us four pickings this year but we should be great-ful that the plants produced this much. The weather conditions this year were not great for beans. This week each member will receive 1.5 pounds of beans. They really came through for us one last time. When you drive in you will see they are not on the hill anymore where they were.
Pie Pumpkin.......
You can either cook with this or decorate with it. I will tell you a tip to make your pumpkin last longer. Cover the pumpkin in a coat of clear painters shellac, this seals the pumpkin from moisture. Most importantly it makes the pumpkin shine like no other. Also pumpkins last longer sitting in your grass then they do on your concrete porch.
Hab's.....
Always on rack help yourself.
Herbs...
They are quite abundant in the bed, please indulge in them.
I hope you enjoy this weeks box just as much as I have enjoyed picking & packing it for you.
Thz chris
P.S. Members also have asked how long we are going to run the C.S.A this season. After talking it over with Martin & Ben and analyzing our field's we feel confident we can run successfully to week 18. So stay tuned because Ben is planning a C.S.A. potluck & I am really excited to hear how everyone utilized their produce this year. I strongly encourage everyone to come!!!!!!!!
Sunday, September 11, 2011
GLUTEN FREE PRODUCTS!
Their is a growing need for Gluten free products in our community & we have some in our store that our made in Tipton, Ia. I have forgotten to mention them on the blog thus far. They are excellent & made right down the street. Anyone can Eat a Gluten Free Product!
Farm Update!
Things at the farm are changing fast. This is alway's a busy time of the year for the farm. We are hustling to clean up some veggie patches and getting ready for the fall Harvest. We are going to have a Fall Festival October 1st. So please mark you Calendars!!! BRING YOUR KIDS!!!! HAYRACK RIDES!!! This is available to everyone so bring your friends. Their will be lots of pumpkins, squash & gourds. The pumpkin patch is super full. On September 24th we are picking pumpkins all day. So C.S.A members if you want to come hang out and pick some pumpkins with your kids or yourself you are more then welcome to show up. It is quite an experience. If you come help us pick we will give you an early pumpkin. From a crop standpoint we are finishing up with the summer veggie's. We should be through those in the next two or three weeks. Then everyone should get lots of squash & others...:) The Farm's new outdoor fireplace is done. So if anyone is interested in a private tour of the farm please call the store. This usually consists of a private hayrack ride, tour, & fire. Also many of the C.S.A members have asked how pumpkins will work & how many they get. Member's will all receive pie pumpkins in their box. Each C.S.A. member is allotted three decorative pumpkins, you can bring the kids out and pick them out of the field or off our hill in front of the store from October 1st through-14th. For sure items in the C.S.A this week so far, squash, brussels, pie pumpkins & others....
Thz Chris
Thursday, September 8, 2011

Subscribe to:
Comments (Atom)